Showing posts with label pinterest weekly project. Show all posts
Thursday, September 25, 2014
Burlap Candy Corn Banner
I wish I could take credit for coming up with the idea for this super adorable burlap banner, but I actually found it in the motherland (A.K.A. Pinterest.) I came up with a pattern and got started. There are actually 6 pieces on this banner but it was too hard to get them all in the photo. You'll just have to trust me. ;-)
This project is simple. Just cut out triangles in burlap, paint them (and allow them to dry in between colors,) polka dot them (with the end of a foam brush,) then fold down the top edge about 1/2 inch and sew a loose zigzag stitch across the top and stitch them to twine, which has been hidden in the fold. Then cut various ribbons and rick rack and tie them in between the triangles. Then trim up the edges to get rid of the fraying burlap. Voila!
I keep on selling these so I am guessing that I am not the only one that thinks it is cute. I finally had a surplus and was able to keep one for myself. I think that is the hard part of being a professional crafter. You make them for others, and then miss out on having them for yourself! Oh well. It is fun to send my projects to new homes. I kind of like the fact that they value my work enough to pay for it. Very vindicating. (See kids, the messes are worth it! Yes, you can buy more Pokemon cards...) ;-)
Happy that the weather is starting to change around these parts. Can't wait for the cooler weather to stick around. Happy that pumpkin spice EVERYTHING is happening now. So fabulous. Happy Jen is happy! :)
Sunday, April 7, 2013
Wooden Owl Magnets
I just had a birthday! Yes indeed. I also have a daughter and a friend who share it with me! Now, my daughter has a party planned for this coming weekend and I am busy busy doing projects for her. (More to come about that in a later post.) Turns out that I got to be celebrated too! My friends all got together to celebrate our groups early April birthdays with a potluck. SUPER fun!! I just love those ladies. So blessed to have them in my life. So we had chicken tacos, salad, fruit, beans, and yummy oreo cupcakes for dessert. Mmmmmm. (Beats the sandwich I usually have...)
Anyway, I really like to give handmade gifts to my friends, since we all like the crafty stuff. I wanted to make a little something for my friend Dana. I searched Pinterest and found the cutest owl magnets with clothespins to hold art or business cards, etc. Since I was given a new scroll saw from my Mom for my birthday, seemed like the perfect opportunity to get back into wood crafting. Discovered just how much I missed it! I am so excited!! SO... I sketched out a template and went to work. I sanded the cut out shapes, painted them, decoupaged paper pieces to the owl body and to the clothespins. I added heavy duty magnets to the back with hot glue and attached a jute twine hanging line. I figured that her name will be removed to allow for her beautiful children to display their artwork on the fridge. OR she could just take ownership of whatever metal surface she chooses... I really love the results. I want to make them for all my friends now!
Monday, March 18, 2013
Spring Tissue Paper Flower Wreath
I am, once again, a professional crafter. LOVE it!! This is the first of two projects that she commissioned me to do. I will post the other project soon.
So, here is the inspiration wreath and in the photo above is my finished wreath that was delivered to its' new owner. I know she liked it because she posted a picture of it hanging on her door, on Facebook, and then publicly told me so. (That is, like, the most important form of approval these days.) ;-)I already completed my second order for a Spring tissue paper flower wreath (photo on the right) and am hoping to dig up more interest. Here is an easy to follow tutorial. Now you can be a pro too!
Thursday, January 24, 2013
Valentine's Day Candy Kebobs
I saw this idea on Pinterest and thought I would give it a shot. Super cute, I think. I was also thinking I could cheaply whip up a bunch for Valentine's exchange gifts for my kiddos. I was wrong, unfortunately.Making 36 of them for my child's class would have been too pricey. The kind of candy you need is heavy, so even buying in bulk at WinCo was an investment. So... I am settling with making 8 for my MOPS ladies.
I can give you a tip for when you decide to make some. Keep a damp towel nearby to wipe your fingers. This gets REALLY sticky (understatement.)
Another tip is to make sure to get the shorter skewers, otherwise you will have too much overhang. I found the shorter ones at Party City, of all places, along with the pretzel rod bags (in the baking supply section.)
The ribbon I chose was 80% off at Hobby Lobby. It was left over from all the Christmas stuff. LOVE those kinds of bargains. I got a couple other rolls of red ribbon to keep in my ever growing stash. I mean, for 60 cents each?! Can't beat that! I may end up making some cute tags to go along with these. Not sure yet. My group meets next week...
I guess it all depends on if the magical extra-free-time fairy stops by my house. ;-)
Monday, January 7, 2013
Flameless Candle Snowman Pins

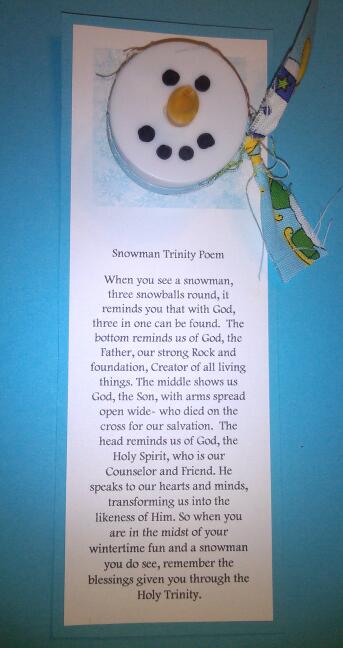
I wanted to give my MOPS table another little treat and I had seen a cute project made out of a flameless votive candle. I found a package of 3 for $1 at Dollar Tree. Super cheap! I found the trinity poem on the internet and the idea on Pinterest. I put 9 of them together in about 2 hours from start to finish. Just used an orange Sharpie marker to color in the "carrot" nose and a black one for the eyes and "coal" mouth. I hot glued on a pin back in case they wanted to wear them ever (probably not, but it sure made it easier to attach them to the poem cardstock!) So, if nothing else, the pin made my job as assembler much easier.
I think if I had more time to plan this one, I would have purchased some cute polar fleece material for the scarf but since I didn't... I just used up some snowman fabric that I had on hand. In any case, it added a little cuteness to my MOPS lady friend's days. Or at least I think they did.
Here is the poem, in case you would like to use the idea for a project of your own.
Snowman Trinity Poem
by anonymous
When you see a snowman, three snowballs round, it reminds you that with God, three in one can be found. The bottom reminds us of God, the Father, our strong Rock and Foundation, Creator of all living things. The middle shows us God, the Son, with arms spread open wide, who died on the cross for our salvation. The head reminds us of God, the Holy Spirit, who is our Counselor and Friend. He speaks to our hearts and minds, transforming us into the likeness of Him. So when you are in the midst of your wintertime fun and a snowman you do see, remember the blessings given you through the Holy Trinity.
Thursday, December 13, 2012
Reindeer Class Treat Holders
I found another cute little project on Pinterest and thought I would give it a shot. Made 28 of them for my second grade son's Christmas party for next week. Been crafting up a storm lately and having a total blast! Super easy to make this one too.
Just cut a 5x7" piece of cardstock, roll it into a tube (so it looks like a toilet paper tube,) and then hot glue one of the edges. Turn it over and fill with goodies (we used mini Snickers and M&M candies,) then hot glue the edge in the opposite direction.
Use a paper crimper to crimp the edges, about 1". Then you add the googly eyes and red pom pom nose with hot glue. Draw a mouth of any style you choose with a felt tip pen. Attach the chenille stem antlers with hot glue and you are done!
Pretty quick to assemble which is a bonus. Would make an excellent last minute party favor. Enjoy!
Just cut a 5x7" piece of cardstock, roll it into a tube (so it looks like a toilet paper tube,) and then hot glue one of the edges. Turn it over and fill with goodies (we used mini Snickers and M&M candies,) then hot glue the edge in the opposite direction.
Use a paper crimper to crimp the edges, about 1". Then you add the googly eyes and red pom pom nose with hot glue. Draw a mouth of any style you choose with a felt tip pen. Attach the chenille stem antlers with hot glue and you are done!
Pretty quick to assemble which is a bonus. Would make an excellent last minute party favor. Enjoy!
Saturday, November 24, 2012
Homemade Yarn Ball Christmas Wreath
I have a friend that recently requested that I do her a favor and make her some kind of a yarn ball wreath for her front door. She is having a party soon and since I am all over the idea crafty challenges, I accepted the opportunity with enthusiasm. :) I asked her to send me a picture of what she had in mind and it seemed like something I had the skills for. I asked her if she didn't mind if I just used her photo as inspiration and came up with a design of my own. She said to go for it! Yay!! So here is my result. It is on an 18" wreath form, covered in white fabric strips with all the ornaments and embellishments and yarn balls hot glued on.
I will give you a tip, if you decide to give this project a shot. Get a TON of glue sticks! I went through a whole bag of mini ones to put this together.
I had another friend ask me if I purchased the yarn balls somewhere and I explained to her that I made them. It was super easy too! I did a little searching and found the styrofoam balls were REALLY expensive. 6 for $4.79. Since you need about a gazillion for this wreath, I searched the internet for a solution. I found a great tutorial on how to make them with newspaper and tape. Hooray! Since I had the tape on hand, the total cost for the balls themselves was $0! Love a good bargain!
I think you can have a blast designing your own wreath. I know I have! I am currently designing my third. Kind of addicting actually. Have fun!
I will give you a tip, if you decide to give this project a shot. Get a TON of glue sticks! I went through a whole bag of mini ones to put this together.
I had another friend ask me if I purchased the yarn balls somewhere and I explained to her that I made them. It was super easy too! I did a little searching and found the styrofoam balls were REALLY expensive. 6 for $4.79. Since you need about a gazillion for this wreath, I searched the internet for a solution. I found a great tutorial on how to make them with newspaper and tape. Hooray! Since I had the tape on hand, the total cost for the balls themselves was $0! Love a good bargain! I think you can have a blast designing your own wreath. I know I have! I am currently designing my third. Kind of addicting actually. Have fun!
Sunday, November 11, 2012
Fall Embellished Coaster Decoration
In case you are new here... I am in MOMSnext. We meet with one of our local MOPS groups until we are big enough for our own shindig. Someday...One of the things I really enjoy is that it gives me the opportunity to make crafts and gifts for and with my new table friends. This month, our group is getting together for an outside activity craft night without kids. SO fun!! I was asked by my group to create a project and gather supplies so that we can meetup and have a grand ole' time. Makes me so happy! I wish I could do things like this every day and get paid for it. Would be the coolest job ever!
Lately I had been stalking Pinterest (again) and saw some really cute ideas that I wanted to try someday. Then, I happened to be at Target and saw that their "purple dot" merchandise in their dollar spot was 50% off! My favorite!! I found a package of 8 chipboard coasters for 50 cents. Score! Suddenly had my project ready to go. Seemed like a perfect thing for all skill levels- from the crafty to the not-so-crafty. Hopefully everyone will have as much fun creating it as I did.
First, I drilled holes in the corners of the coasters. Then I used my trusty Mod Podge to apply the scrapbook paper. Sanded the edges and inked them with Stampin'Up ink. Then I thought some sparkle would be good so I used my glue pen to apply some coppery Martha Stewart glitter. Next I used my Big Shot machine and my leaf die to cut out the leaves, crinkled them and inked them with my Stampin' Up ink then embellished with buttons and some linen thread. I also cut out the "Fall" letter in vinyl with my Cricut machine. Next step was to coat the whole project with another layer of Mod Podge to seal it, let it dry, then hot glued the leaves in place. Last step was to thread brown organdy ribbon through the holes and created a bow to be used to hang the project. Really happy with the results! Thanks to my find on Pinterest for the inspiration!
I will call this my weekly Pinterest project, even though I have missed so many weeks it is ridiculous. Just got to throw myself back in the game! (again...)
Sunday, October 7, 2012
Vaseline Distressed Fall Monogram
![]() |
| Base coated and ready for the Vaseline. |
![]() |
| Close up of the distressing. |
The letter I found is paper mache, about 12" tall. I found it at Joann for $4.49 and used my 40% off coupon. Bought a bottle of ivory paint for .89 cents and got the berry sprig at Micheals. It was $1.39 with 50% off. I had the muslin, twine, buttons, and hot glue. So, super cheap project, yet again!! Love it!
I could explain how to do the vaseline distressing technique but it would be easier to send you to where I learned it- Shanty 2 Chic. (Love that site!) Also need to show you my inspiration piece. Found it on Pinterest, of course. I feel like making a couple more for gifts for my family... Shhhh, don't tell them.
Thursday, August 23, 2012
Personalized Magnetic Note Holders


My crafty buddies got together recently to celebrate 4 of our group members birthdays. August is a popular month to be born, apparently. Now, when crafty buddies have birthdays, you have to create something super cute to give them. if you have time anyway. Well, I almost didn't. But I was able to locate some creativity somewhere deep down inside of me and came up with something pretty cute! I found the wood circles at Michael's and the clips at Target in the $1 section. I already had the papers and the ribbons and I used my Cricut to cut the vinyl lettering. I used my trusty Mod Podge to seal the project and attached the clip and the magnets (on the back) with my E6000 adhesive. One of my buddies asked me where I got the idea and honestly, I got the inspiration from a bunch of different Pinterest projects that I have seen in my perusing. I guess I could go ahead and count this as my 10th weekly Pinterest project, even though I don't have a specific project to link to. You'll forgive me, I am sure... ;-) I hope you are able to make some of these. Would be excellent for a cute teacher gift or something like that. Thanks for stopping by!Friday, August 17, 2012
Quick Coffee Cake in a Cup

My daughter is a Tumblr freak. She is as into that as I am into Pinterest! Or almost that much at least. Anyway... the other day she asked me if she could make something that she saw on there. I blindly said, "yeah, sure. Just clean up after yourself." A few minutes later I smell this delicious aroma wafting through my house. It smelled like freshly baked cinnamon rolls- all gooey and sweet and cinnamony. I was intrigued!"What the heck IS that FABULOUS smell?!" "Coffee cake in a cup," is what she said. "Gimme some!!," is what I said back. Oh. My. Goodness! I was instantly a fan. You guys have got to try this when you need something sweet and you need it NOW.
Coffee Cake in a Cup for Two
2 Tbsp softened butter
4 Tbsp sugar
1 egg
4 Tbsp sour cream
1/8 tsp vanilla
1/2 cup flour
1/4 tsp baking powder
Crumb Topping:
2 Tbsp softened butter
4 Tbsp flour
2 Tbsp brown sugar
1 tsp cinnamon
In a small bowl, cream butter and sugar with a spoon or fork (mixer is not required.) Add egg, sour cream and vanilla and mix until smooth.
Add flour and baking powder, stir until smooth. Split the batter between two coffee mugs. Set aside.
In a separate small bowl, mix butter, brown sugar, flour, and cinnamon until evenly blended. Split in half and place on top of the batter in each mug.
Cook one mug at a time in the microwave. I would start out with one minute and continue by 10 to 15 second increments. (Ours took about 2 minutes total, but we put it in one giant mug instead of two regular ones.)
Be careful because the mug and the cake will be really hot. Enjoy!
Friday, July 20, 2012
Pinwheel Wreath
I needed a gift to give a friend who is going through some difficult adjustments in her life. Looked to my trusty Pinterest, yet again. That fabulous site did not disappoint. Here is the pinwheel wreath that came out of my search. It is kind of a persnickety craft (I always loved using that word...) and takes a little patience, but it is easy enough once you get the hang of it. I would try to explain how it is done but the original poster did such a better job. Here is the inspiration project.
I ended up finding one of those floral foam type, green wreath forms at the Dollar Tree. I covered it in strips of natural colored muslin so the green didn't show through. I chose a complimentary light yellow ribbon for the hanging strap.
I found the double sided scrapbook paper at Hobby Lobby. The brand is Authentique. I am kind of in love with it. ;-) You can't see, but I used some additional long dress pins to keep the pinwheels in place. They definitely needed the extra support. Glad I did that. I need to make a card to go with this wreath. Tomorrow it gets a new home at a friend's house. I am kind of excited. Hope she likes it!
Super Easy Button Bracelet

I have been feeling like I need to do a little crafting lately. It has been awhile! I needed a project for my weekly Pinterest project commitment and I needed to make a couple of "thinking of you" gifts too. So I looked and looked and came up with several options. This idea was one of my favorites. Pretty simple concept and took very few supplies. Sounded perfect! The hardest part was trying to convince the end of the cording to go through the button holes. I recommend painting it with clear nail polish to make it easier to slide through, it will save you a ginormous headache. (Don't ask me how long it took me to figure that tip out...) ;-) I will also mention that trying to use buttons with two holes makes it ridiculously hard. I even called in my crafty critical thinking reinforcement A.K.A. my oldest daughter, and SHE couldn't figure out a way to do it. I guess it is beyond our current skill sets. Oh well. The 4 holed buttons it is!! If you would like to make some of your own, check out this tutorial where I found the idea. Happy crafting!
Thursday, July 12, 2012
Awesome Churro Flavored Popcorn
I have been waiting for the perfect opportunity to make a recipe that I had found on Pinterest for Churro Popcorn. It is hard to find one of the ingredients but I managed to snatch up the last bag that they had at Winco. Score!! It also happens to be the weekend that my group of crafty lady friends has a trip planned to the southern California area to veg out and relax. What better way to veg out than to munch on yummy goodies while you are relaxing. (That is my philosophy anyway.) ;-) I am taking this yummy batch of goodness along for the ride. IF it survives my family's thievery. Hope you get a chance to try it. Sooooooo good!
Churro Popcorn6 cups popped popcorn
1/2 cup cinnamon chips (I used Hershey's)
2 tbsp. butter
2 tbsp. powdered sugar
2 tbsp. granulated sugar
1 tsp. cinnamon
Place popped corn in a large bowl. Set aside.
Melt chips with butter in a microwave safe bowl. Stir and pour over popcorn. Stir gently to coat pieces.
In another bowl, combine sugars and cinnamon. Shake over coated popcorn. Stir to combine once again.
Allow to cool to room temperature. Cover and store or serve immediately.
Pinterest Weekly Project #7 :)
Sunday, July 8, 2012
Panda Express Orange Chicken Copycat Recipe
So... tonight I decided to try another Pinterest inspired recipe. This one caught the eye of my son who requested I give it a shot some time. I had to admit it did look pretty awesome and I had all the ingredients on hand so I went for it. Oh. My. Goodness!! This was about as close to a Panda Express recipe that I could have imagined making at home, that is for sure. I tweaked it a little bit from the original recipe and was really glad that I did. It feels like it took forever to make, but, in actuality, it only took about 20 minutes. Not bad at all. If I made it when I was TOTALLY NOT in the mood to cook (like tonight), then certainly you all can handle it too. ;-) Give it a shot when you are in the mood for Chinese food and you will not be disappointed. I made broccoli and steamed rice to go with it. Super yummy!!
Just-as-good-as-Panda-Express Orange Chicken
2 lbs boneless skinless chicken breasts, cut into bite size pieces
2 cups cornstarch
vegetable oil, for frying the chicken
dredge the chicken pieces in cornstarch and cook in preheated oil, in small batches, until light brown, about 6-8 minutes. Set aside.
sauce:
1 cup water
3/4 cup ketchup
1/2 cup sugar
1/4 cup rice wine vinegar
1/2 tsp orange zest
juice of 1 orange
1 tsp chicken bouillon powder
1 tsp soy sauce
1/4 tsp salt
1/4 tsp ground ginger
1/4 tsp red pepper flakes (optional)
4 tsp cornstarch
Next, combine sauce ingredients in a mixing bowl until blended well. Heat to a simmer in a frying pan, large enough to hold all the chicken pieces. Once simmering, allow to thicken for 3-4 minutes. Add cooked chicken to sauce mixture and stir to coat the pieces. Allow to thicken a little more, about 2-3 minutes. Remove from heat and serve.
Let's just call this one my Pinterest Weekly Project too. #6. :)
Linking here:
Friday, July 6, 2012
Taco Pizza
Tonight for dinner I made a Pinterest inspired dish again, called Taco Pizza. We have had this a couple of times recently and I must say, it is sooooo yummy! Just wanted to do a quick post and share the recipe. I am positive that your whole family will love it. (Just take off the onions and tomatoes for the picky eaters...)
Taco Pizza
1 lb. ground beef, browned and drained
1 pkg. taco seasoning (added to ground beef according to package instructions)
2 pkg. Pillsbury crescent rolls (don't use generic, it makes a difference, and not in a good way)
2 cups shredded cheddar cheese
1 can refried beans (I used Taco Bell brand, fat free because it spreads really easily)
1/2 cup diced tomatoes
1-2 green onions, sliced
small can sliced olives (optional- I didn't use them tonight because I forgot them on the store shelf...) ;-)
Preheat oven to 375 degrees. Lightly spray a jelly roll pan with nonstick spray. Unroll the crescent rolls and stretch them to cover the whole bottom of the pan. Bake for 12 minutes or until light golden brown. Remove from oven and spread the can of refried beans to cover the surface of the baked dough. Evenly spread the prepared meat mixture over the beans. Cover the meat with the shredded cheese. Sprinkle the tomatoes and onions and olives (if you didn't forget them at the stinkin' store...) over the cheese. Bake the pizza again for about 10 minutes or until the cheese is melted and the pizza is heated through. Remove and allow to sit for 5-10 minutes so the cheese doesn't slide off onto your plate. Enjoy!!
linking here:
![]() |
| Please excuse the spots on my well loved jelly roll pan.... ;-) |
1 lb. ground beef, browned and drained
1 pkg. taco seasoning (added to ground beef according to package instructions)
2 pkg. Pillsbury crescent rolls (don't use generic, it makes a difference, and not in a good way)
2 cups shredded cheddar cheese
1 can refried beans (I used Taco Bell brand, fat free because it spreads really easily)
1/2 cup diced tomatoes
1-2 green onions, sliced
small can sliced olives (optional- I didn't use them tonight because I forgot them on the store shelf...) ;-)
Preheat oven to 375 degrees. Lightly spray a jelly roll pan with nonstick spray. Unroll the crescent rolls and stretch them to cover the whole bottom of the pan. Bake for 12 minutes or until light golden brown. Remove from oven and spread the can of refried beans to cover the surface of the baked dough. Evenly spread the prepared meat mixture over the beans. Cover the meat with the shredded cheese. Sprinkle the tomatoes and onions and olives (if you didn't forget them at the stinkin' store...) over the cheese. Bake the pizza again for about 10 minutes or until the cheese is melted and the pizza is heated through. Remove and allow to sit for 5-10 minutes so the cheese doesn't slide off onto your plate. Enjoy!!
linking here:
Saturday, June 30, 2012
Pallet Art with Pennants
Tonight was another one of my monthly craft group meeting and I thought I would show you what I made. I am really liking it a lot!! My friend had mentioned that she would be creating the pallet itself and staining it and that we were to come up with a saying or something to paint or stencil on the front of the board. It was so fun to search the multitude of examples all over the internet and it just so happens that my inspiration piece came from Pinterest (no surprise there...)
We used the Cricut machine to cut out the words on contact paper and then carefully placed the letters down and stenciled with regular old acrylic paint. After it was dry I lightly sanded all the edges to give it a distressed feeling. I chose to make pennants out of fabric die cut scalloped edge squares, turned on their side and strung on jute cording. I just hot glued them in place. I have to figure out a way to hang it appropriately over my couch where it will be living. I am sure my family will appreciate it not falling on their heads at any point in the future. ;-)
This is my weekly Pinterest project. #5 to be exact. Thanks for visiting!
Saturday, June 23, 2012
Patriotic Rag Wreath
I had a couple of friends over the other night and we made a craft and talked like grown ups. I had a fun time, yet again, and am pretty happy with the results. It is hanging on my front door as we speak. Thanks to Pinterest for showing me the idea.
Here is a word of caution, if you attempt to recreate this project. PLAN ACCORDINGLY!! It took me about 6 hours over the course of 2 days to tie the 1" x 6" fabric strips into knots on my wire wreath frame. Of course, I chose the 24" frame which probably was a little ambitious of me... Anyway... my sister-in-law made a smaller version and she was done before the evening was over. I wished I was her for a second. ;-) I chose to put an "A" (for Avila) in the center and so I went to Hobby Lobby and found a plain wood letter which I chose to paint with Americana acrylic paint in white wash and attached it through the frame with wide organdy ribbon.
This will be my 4th entry for my Pinterest Weekly Project file. I have been keeping my word to do something weekly! Aren't you proud of me! ;-)
Thursday, June 21, 2012
Paperclay Donut Ring and Mushroom Pendant


My oldest son's good "friend-girl" is having a birthday again. Funny how that happens... She will be 12 and we needed a cool unique gift for her. She likes little animated characters and cute little girly things so it kind of made sense to craft her up something sweet.
I just happened to have picked up a brand new package of Creative Paperclay that I was dying to put to good use and so I searched Pinterest for some inspiration. I found so many super cute ideas and was finally able to narrow down to one direction.It just so happens to be time to post my week #3 Pinterest Project anyway, so, yet again it was great timing! I am so hooked on this fabulous stuff. I can see a fun crafting future with my Paperclay!
I will try to roughly explain exactly how to recreate what I have made, just in case you were interested. But basically, you just grab a hunk of the stuff and start rolling it and shaping it until you have a recognizable figure. Then you set it aside to dry (it took about 24 hours to completely set.) Before you leave it alone to dry, you would put a screw eye in the top of each item, if you need one. When the pieces are dry, you paint them and let them dry, yet again.
Then I Mod Podged each of the pieces to seal them.
For the bottle cap ring, I measured and cut a piece of scrapbook paper to fit in the bottom and Mod Podged that in place and allowed it to dry. Before you put the donut pieces on top with E6000 adhesive, you would add glitter or any other embellishments that you choose. The last step is attaching the jewelry hardware, etc.
Monday, June 11, 2012
Cute Little Fabric Tissue Holder
This past weekend, I was given the opportunity to go on a fabulous girl-friend trip to Southern California. I was so excited to go since it was my first girls trip EVER!! We went to Burbank and the IKEA store (first time in that place...WOW!! is it BIG,) but our main event was going to the Rose Bowl Flea Market in Pasadena. While we were down there, we stayed at the most beautiful hotel, The Langham. We ate at all kinds of fun places, shopped at all kinds of cool stores, talked like grown ups and behaved like them too! It was amazing. Totally what the doctor ordered. It was so cool that it worked out for me to go and to be with a great group of friends. I am truly blessed. :)To "celebrate" our trip, I was inspired to give a little gifty something-or-other to my travel buddies. I searched for the perfect thing to whip up and found this really cute little tissue holder tutorial that seemed like it would be perfect!
Since I had also made a commitment to you guys, to do a Pinterest inspired craft or recipe weekly, my gift project did double duty. So, Pinterest Project Post week 2 complete! Hooray! (Check out week 1 here.)
Super easy to make. I finished mine in about an hour or so. You could easily make up a bunch and keep them handy for last minute thoughtfulness. Here are my final results, all packaged up. :)
Subscribe to:
Posts (Atom)
Powered by Blogger.
.jpg)